When it comes to wallets, it helps to have a reliable developer. Thankfully, Yoroi is built by the same company that builds the Cardano blockchain, so it’s hard to go wrong with it.
It also has some of the highest numbers of users among Cardano-based wallets considering it was launched in 2018, and has advanced a great deal since in terms of functionality, security, and user-friendliness. It is also compatible with Ledger wallets, which allows for greater protection.
This guide is designed to tell you 95% of the things you need to know about Yoroi wallet, from creating it, to depositing your first funds, to sending and receiving fungible tokens and NFTs, to staking, etc. For the five percent, you’d have to figure that on your own.
What is Yoroi Wallet?
Yoroi is a lightweight Cardano wallet that allows users to connect to various decentralized applications (dapps) across the network, send and receive payments, and store NFTs in a relatively simple interface.
Yoroi is designed as a day-to-day wallet and is more beginner-friendly compared to its full-node counterpart, the Daedalus wallet. It is engineered by IOHK, Cardano’s research arm, and has gone through comprehensive audits, making it one of the most secure crypto wallets.
Since it is a light client, you don’t need to download the Cardano blockchain in order to use it. Furthermore, it also has strong privacy features thanks to its ability to generate new addresses for every asset deposit under one wallet account. For instance, if you send someone your Yoroi address so they can pay you but also don’t want them to know your entire account balance, you can simply generate a new address and it will appear like you have 0 funds.
Advantages of Yoroi Wallet
| Secure | Built by the same builders of Cardano and undergoes audits regularly. |
| Easy to Use | It is relatively simple to use and set up relative to full node and other types of Cardano wallets |
| Privacy-Preserving | Yoroi has the ability to generate ‘external addresses’ every time they receive assets. More details here. |
| Fiat-onramps | You can buy ADA directly from your wallet with a credit/debit card |
Disadvantages of Yoroi
| Relatively Slow | Many users have reported slow loading for Yoroi while others say it works fine. |
| Incompatible with NFT Marketplaces | Cannot connect to NFT marketplaces on Cardano |
| No Native NFT Viewing | You currently can’t view your NFTs directly in your wallet yet. That will change in the coming updates. |
How to Use Yoroi
Yoroi has a simple design, making it applicable to all users; even beginners. Ready to use the wallet? Start by downloading the browser extension below:
Download Yoroi Wallet
Start out by downloading the Yoroi wallet extension on the website and installing it.
Note that the wallet is accessible in different browsers such as Chrome, Edge, and Firefox. It is also compatible with two mobile operating systems: Android and iOS. However, if you want to experience the full features of Yoroi, we recommend using your desktop.
Create a Yoroi Wallet
After downloading, it’s time to set up your Yoroi wallet. This will only take a couple of minutes.
Run the Yoroi Extension
After installation, you can find the Yoroi icon on your browser extension area; click it to initialize wallet setup.
Wait until your screen brings you to the site. Choose your preferred language to proceed and click Continue.
Choose a Blockchain
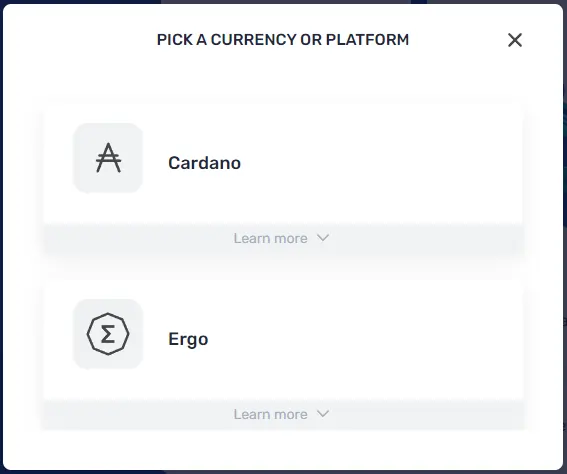
After conforming to the terms and conditions of Yoroi, your screen will display two options: Cardano and Ergo. Unless your intention to create a wallet is to use the Ergo chain, chances are that Cardano is what you’re after. Choose Cardano and create a wallet.
Set Up Your Account
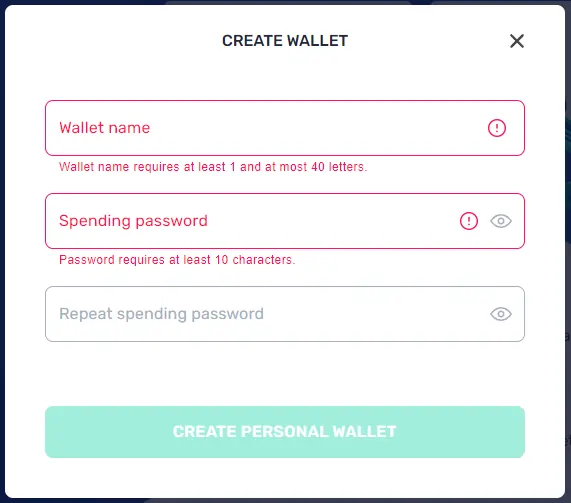
Create a wallet name and a spending password. Input the same password in the last empty box. Click on CREATE PERSONAL WALLET to continue.
Note that a spending password is different from your private key and recovery phrase, as it is only stored locally (in your device). Its primary purpose is to prevent family members from easily spending your funds without your consent. Be sure to remember it.
Keep Your Recovery Phrase Safe
Yoroi will give you a recovery phrase, a group of random words exclusive to you alone, which you definitely need to keep safe. If you ever lose access to your wallet for whatever reason, the recovery phrase will allow you to recover it using any device as long as you remember the combination. Note that they are case sensitive, so do your best to memorize them, if not store them somewhere secure.
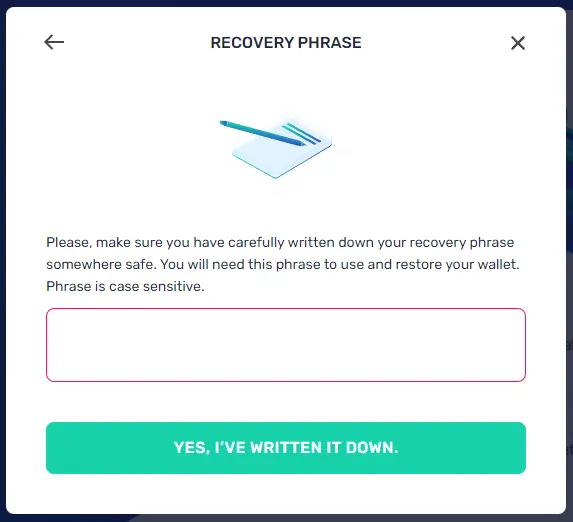
Yoroi will ask you to assemble your recovery phrase in order. Once you get it right, you will automatically get your account.
Congratulations! You can now start transferring and receiving funds on the Cardano network.
How to Deposit Funds (ADA) to Yoroi
Before you can truly use your Yoroi wallet, you’ll need some ADA to enable sending. The Cardano blockchain requires you to pay a very small amount of ADA for every transaction you make.
This guide will show you how to make a deposit directly from your browser extension. Here are the steps to follow:
Access All Wallets
Go to All Wallets to see the amount of ADA in your wallet. This can be found in the drop-down icon ( 🔽) on the top-right.
In this example, it is still empty. So, click on Buy ADA to begin the process.
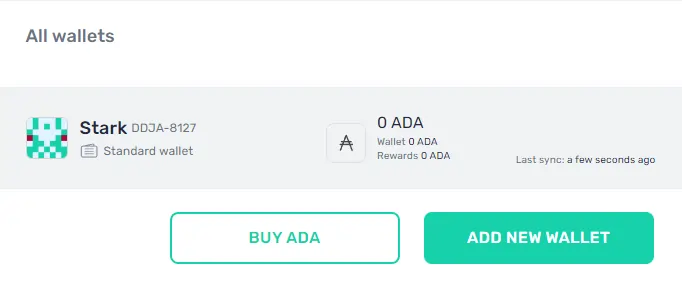
Your screen will prompt two options for the receiving address. Choose your current wallet address. Alternatively, you can also fund another wallet by clicking I will add my address manually to send it to a different receiver.
Fill Up the Details
Your screen will direct you to the next step, where you input the amount of ADA you want to buy. Your chosen currency’s value will coincide with your ADA automatically. Click on Exchange to proceed.
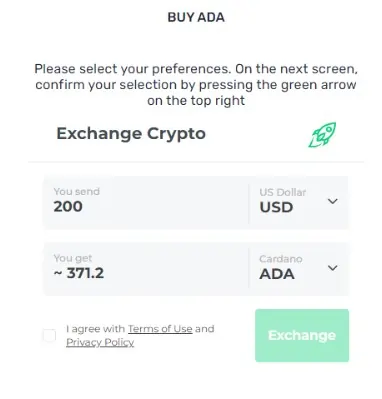
Confirm the Transaction
The platform will direct you to the website, where you can see your transaction summary. Click on Continue to move onto your billing address. Fill it all up to proceed. Note that the transaction includes a processing fee.
Agree to the terms and tap on Buy Now. Wait for a while until you receive your ADA in your wallet address. You can check your Yoroi dashboard to verify your newly-received digital asset.
Alternatively, you can also buy ADA from centralized exchanges like Binance, Coinbase, Huobi, and FTX.
How to Receive ADA or Cardano Tokens
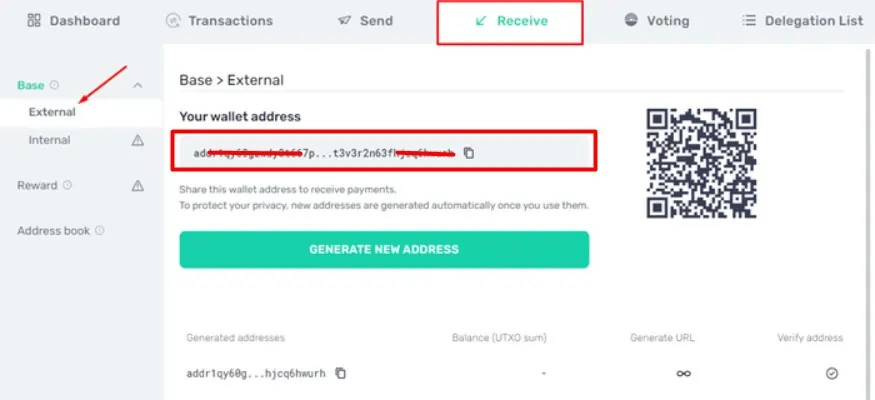
In order to receive funds, you first need to find your wallet address. When using the Yoroi extension, there are multiple tabs on your screen. Go to the Receive menu, and click on the external submenu.
Your screen will show your wallet address, a unique combination of characters that look like this: addr1qx4vsw50wn42n6l7sr37dd6y0zg92j7kvq6v84yyle4mihnjv064p9pyr25g7yaq3zr6mv6tt7a086yg9760lymvrn9sxaju9q.
Copy it and send it to whoever is about to send you ADA. You can also send them the QR code as an alternative option.
How to Send Funds to Another Address
Sending ADA and other Cardano tokens is as easy as receiving them, which requires the receiver’s public address. Note that you need to hold a small amount of ADA in your account to be able to pay for network fees.
Go to the Send tab, and input the necessary information: the receiver’s wallet address and amount. Note that the processing fee will vary depending on how many Cardano tokens the account will send, but on average it’s usually around 0.17 ADA.
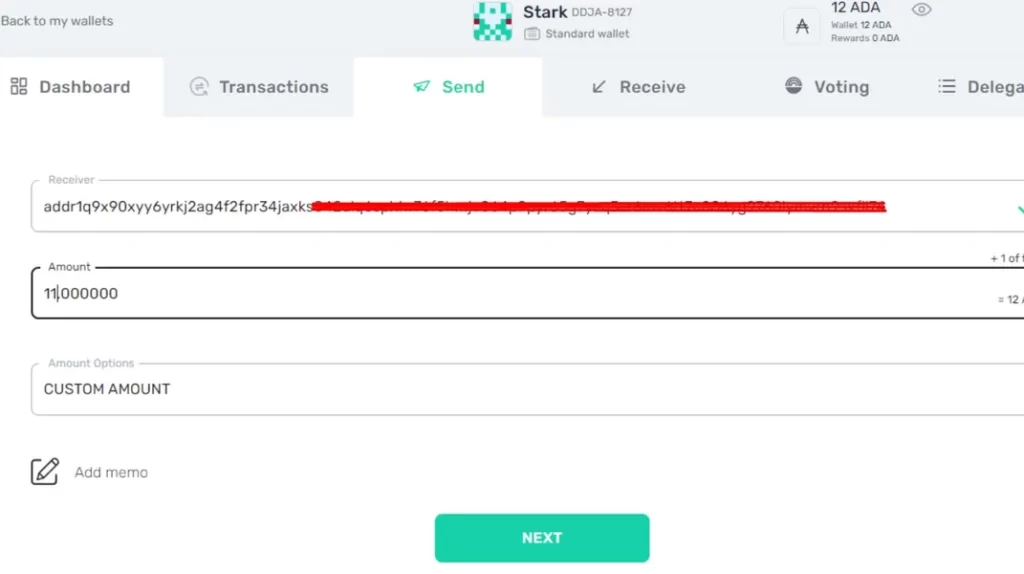
Proceed to the next page by tapping the NEXT button. Confirm the transaction, and wait for a few seconds to finish. Yoroi will send you a note about successfully receiving the funds.
It is worth mentioning that Yoroi allows you to generate a new address every time you use them. Thus, your privacy is protected. You can check the status of the transaction in the Transaction tab.
How to Connect Yoroi to Dapps
Users can use Yoroi to connect to numerous dApps built on the Cardano blockchain, ranging from DeFi protocols to NFT platforms. Do not worry; the steps are just easy.
Go to the official page of the dApp you wish to access, and find the Connect option. This is usually located on the top-right of the webpage. Your screen will prompt your wallet listings. Choose Yoroi wallet, and link it to the application.
For instance, the Fibo interface instantly shows the connect button. Clicking on it automatically shows my wallet. Ta-da! Now I’m connected.
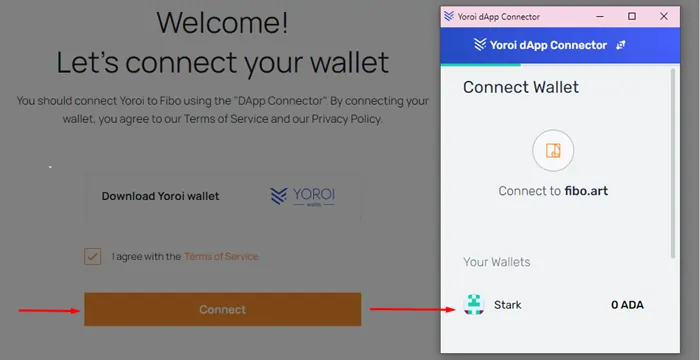
You can do the same with any Cardano-based application. Note that each dApp may vary from one to another, but the general process of connecting it to Yoroi involves the steps above.
What Assets Does Yoroi Wallet Support?
Yoroi supports the ADA coin and tokens built to run on the Cardano blockchain, as well as Emurgo. Check the full list here.
Is Yoroi Wallet Safe?
Yoroi is built by the same organization as the Cardano blockchain, which makes it one of the top most secure Cardano wallets in the market. However, the security of your funds also depends on how much effort you put into keeping them safe.
Did you truly memorize your recovery phrase or just wrote it down? If it was the latter, where do you store it?
Did you connect Yoroi to a hardware wallet? That would make your funds substantially safer. If you want to learn how, we cover that in the sections below.
No crypto wallet is 100% safe due to the nature of digital files. But since a hardware device is offline 99% of the time, theft is extremely unlikely to occur.
- Also check out our Top Hardware Wallets
Can Yoroi Hold NFTs?
Non-fungible tokens (NFTs) are natively supported on the Cardano blockchain, long before smart contracts were even enabled. This means that all Cardano wallets, including Yoroi, can hold NFTs. However, the app itself doesn’t support viewing NFTs in-wallet, so you have to connect to certain dapps to view your NFTs. See FAQs for more details.
How to Stake ADA on Yoroi
The first thing you need to check before deciding to stake ADA on your Yoroi is the rewards calculator. It’s helpful to know the potential earnings you will receive to ensure that it’s worth your while. Input your ADA amount on the staking calculator. You should be able to see the yearly rewards based on the amount.
If you’re still interested in staking, then the next thing you need is some ADA. If you do not have the funds, see our previous section to buy one.
Once you have the funds to begin staking, head to the Delegation List tab. You can search for the name of a particular staking pool or choose from the list. As you will notice, the menu provides you with the ROA, share or pool size, costs, and pledge.
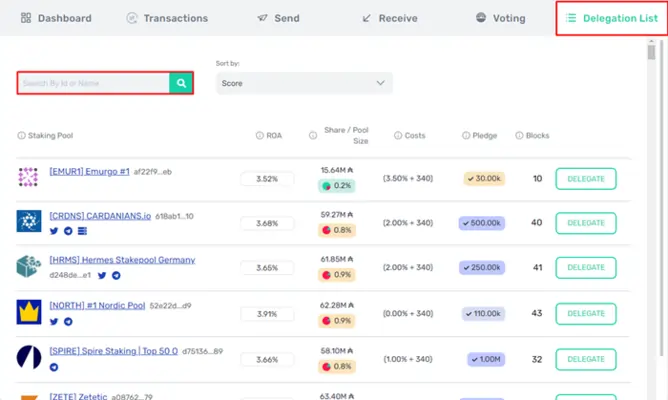
Delegate your ADA to your chosen pool, and wait for the transaction confirmation to pop up on your screen. The example shows the staking rules, which every user should know. It also provides other details such as the total ADA staked in the pool, the corresponding fee, and the reward you will receive every five days.
Note that you can see your transaction details on your dashboard but you won’t accumulate token rewards immediately; getting your first batch may take 25 days total (20 days approval plus one epoch). But you can cancel staking anytime.
You will receive ADA rewards for every epoch that comes. Each epoch lasts for approximately five days on average.
How to Restore Yoroi Wallet
In the unlikely event that you lose access to your Yoroi wallet, you better pray that you still have your recovery phrase as it’s your only salvation. You can access your lost wallet using any device, but we recommend a browser or hardware wallet.
The first step is to redownload the Yoroi extension and access it on your browser, where you’ll be greeted with three options. If you are using a hardware wallet, click on Connect to hardware wallet; if not, tap on Restore wallet.
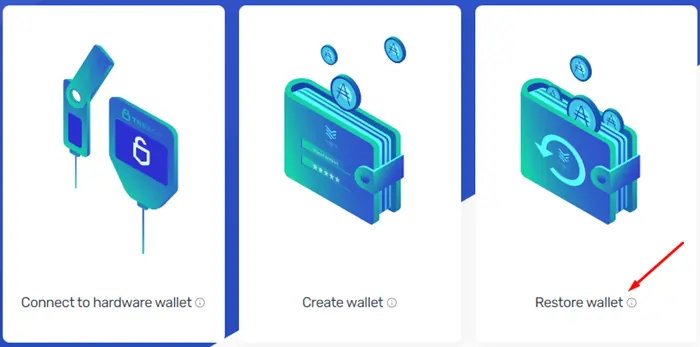
Choose Cardano as the currency and tap on Enter a 15-word recovery phrase. Next is to select an era (refers to when your wallet was created). If you made your account after July 29, 2020, proceed to Standard wallet. Input your wallet name, recovery phrase, and new password.
You can click on the Restore wallet button once active, which will automatically bring you to your Yoroi account. Note that the syncing process may take a while.
Connecting Yoroi with Hardware Wallet
In order to keep your funds extra secure, you may connect your Yoroi wallet to a hardware wallet. The app currently supports both Trezor and Ledger devices. Here are the steps required:
Setup Yoroi Wallet
First things first, you need to have Yoroi installed on your browser. Please see our previous sections for the step-by-step guide.
Download the Cardano (ADA) app on the Hardware Device
Now it’s time to move on to your hardware wallet and download the latest version of the Cardano app, which can be found on both Ledger and Trezor.
Connect Hardware Wallet to Computer
Next, plug in your Ledger or Trezor to the computer that has your Yoroi wallet.
Connect Yoroi to Hardware Wallet
Then, you need to open your Yoroi from the browser. Click on the arrow on the drop-down icon on the top-right. And then click ADD NEW WALLET.
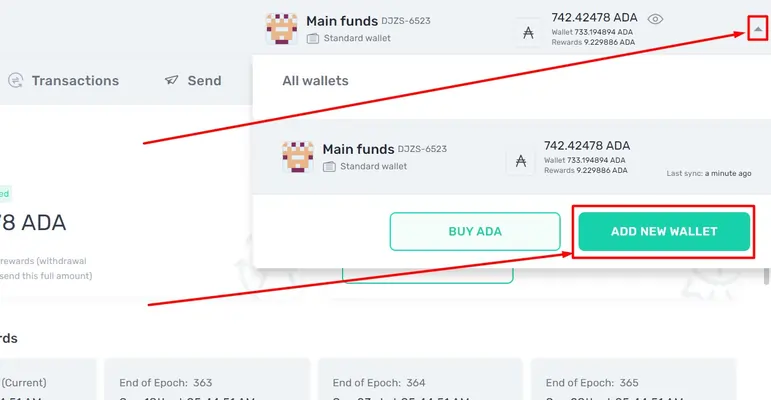
You will be given three choices; select Connect to hardware wallet. Then choose between Trezor or Ledger. Finally, click Standard Wallet.
Finalize the Hardware Device
Open the Cardano app on your hardware wallet.
On your Yoroi app, click Connect. The next few processes should be quite straightforward.
And there you go. Your Yoroi is finally connected to a hardware wallet.
Yoroi Frequently Asked Questions
How to view NFTs on Yoroi?
You can’t view NFTs on Yoroi since the wallet doesn’t support it. The best thing you can do is to connect your wallet with NFT marketplaces like JPG Store or CNFT. Alternatively, you can try out the NFT Craze app, which allows you to view all your Cardano NFTs on mobile.
What are Cardano native tokens?
They are assets built on the Cardano blockchain, such as $ERG, $COTI, $SUNDAE, $MELD. They are different from ADA, which is a coin.
Does Yoroi wallet charge fees?
The wallet itself is free to use. But the Cardano network charges a fee for every transaction, usually around 0.17 ADA.
Join our newsletter as we build a community of AI and web3 pioneers.
The next 3-5 years is when new industry titans will emerge, and we want you to be one of them.
Benefits include:
- Receive updates on the most significant trends
- Receive crucial insights that will help you stay ahead in the tech world
- The chance to be part of our OG community, which will have exclusive membership perks
