Kukai Wallet is the longest-running web3 wallet built for the Tezos blockchain, with its roots going back as early as 2018. It was created by Swedish developer Klas Harrysson to become the ultimate wallet for Tezos, which was barely a year old at the time.
Everything started to gain more traction the moment Harrysson decided to implement DirectAuth, a feature that allowed users to send and receive assets using social media usernames, which was instrumental to their journey of onboarding more than a million users.
In 2021, it started diverting its attention to the Tezos NFT scene, which is one of the most vibrant ecosystems for 1/1 art in all of crypto. You’ll find a lot of the wallet features tailor-made for NFT enthusiasts, but it also caters to cryptocurrencies like XTZ, USDC, etc.
What is Kukai Wallet
Kukai is a Tezos browser-based wallet that allows users to send and receive crypto assets, store NFTs, interact with dapps, and stake XTZ across the network in just a few clicks.
Kukai developers designed the application according to the growing needs of users while upholding three principles: security, community, and reliability.
Lastly, NFT enthusiasts can use Kukai as a home for their digital assets and discover various collectibles and apps. There are different projects to choose from within the Tezos blockchain, including games, marketplaces, exchanges, and more, all of which are discoverable in the wallet app.
Advantages of Kukai
| Easy interface | Kukai is actually straightforward to use. A lot simpler than Temple. |
| DirectAuth | Kukai allows you to replace your long wallet address with your Google, Twitter, Reddit, or Facebook username. This makes it easier to send and receive funds. |
| Jampacked with NFT Features | Its Discovery feature allows you to directly access thousands of NFT collections directly in the wallet. It also has better support for NFT drops. |
Disadvantages of Kukai
| No Built-in DEX | The wallet doesn’t support in-app token swaps, unlike Temple. |
| Lack of privacy | Due to the nature of the DirectAuth feature, Kukai users don’t share the same anonymity level as other wallets. |
How to Use Kukai Wallet
Users can easily familiarize themselves with the Kukai wallet, thanks to its simple design. We prepared a guide for you to be able to use the wallet and explore its features. The steps only take a few minutes to finish.
Launch Kukai
Users can launch the Kukai application by searching its URL or visiting the app portal. Unlike extension-based browser wallets, Kukai can be accessed simply through a web portal. For this reason, we recommend bookmarking the page.
How to Create a Kukai Wallet
The application has an intuitive interface, and making an account is pretty easy. You only need to click Create New Wallet, and your seed phrase should pop up.

Alternatively, if you want something that’s less technical, you can opt to create a wallet through a social media account (Google Twitter, Facebook, or Reddit). However, we highly recommend against this even though it is the easier method simply because of two reasons.
First, it’s not the safest method of managing a wallet due to the inherent vulnerabilities of social media platforms, which puts your private keys, and as a consequence, your funds, at risk. Second, we want you to embrace the web3 spirit of decentralization.
Learning how to manage your own crypto wallets is a step in that direction, allowing you to become a responsible holder who controls your own finances. Now let’s resume the setup guide.
Secure your seed phrase
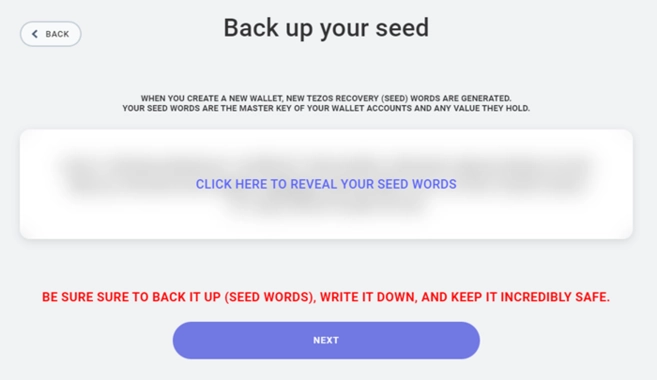
Whenever you create a new wallet, Kukai generates a seed phrase — a set of words that serves as a master key for your account and digital assets. You may memorize it in order to maximize security. Alternatively, you may write it down and store it somewhere safe. Click Next to proceed.
Confirming your seed phrase
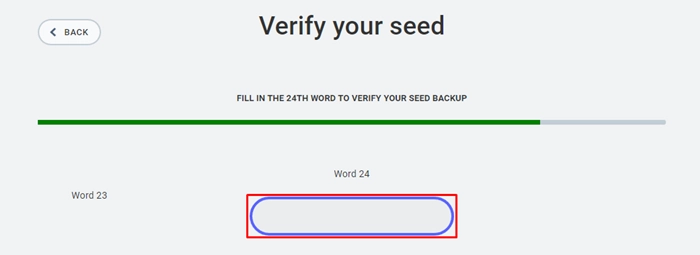
Kukai will ask you to verify your seed phrase by typing the missing words. This will confirm whether you’re executing proper security procedures. Complete it to proceed.
Create a Password
Set a strong password as the application will use it to confirm transactions. Note that you can’t proceed to the next page unless you reach the required password strength.
The last step affirms that you successfully created your wallet. Your screen will show your public address for sending and receiving digital assets.
Lastly, you can opt to download your encrypted keystore file and use it to access your Kukai wallet.
How to Deposit Tez (XTZ) to Kukai
Your wallet should have enough funds to pay for transaction costs (roughly a few cents worth of tez). Before that, you need to deposit some XTZ into Kukai.
There are two ways to do it. You can either buy it directly in the app using a credit/debit card and save time or send it from an exchange if you own an account.
Buy Directly With MoonPay
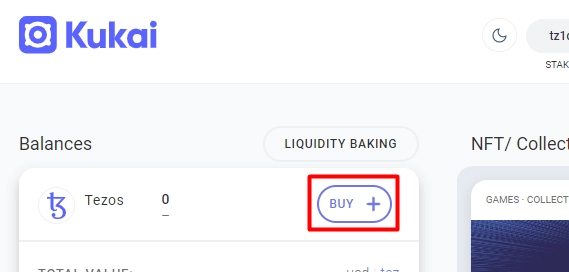
You can access MoonPay directly on Kukai wallet, specifically on the Balances section represented by a plus “+” sign. Click it and the page will automatically bring you to the platform.
You can customize the amount you want to spend in any supported currency. After that, you’ll see your transaction summary. There’s also a breakdown of the network and processing fees you must pay for validators and MoonPay.
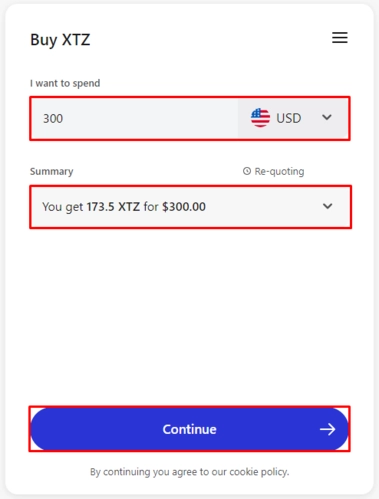
Once you’re done, tap the Continue button.
You can now pay the total amount to receive the funds in your Kukai wallet. Check your account to verify the transaction.
Buy From Exchanges
Another way to fund your Kukai wallet is to buy from exchanges that sell them, such as Binance, Coinbase, and more. Withdraw the tokens in your preferred platform and send them to your public address.
Note that there are transaction fees involved when buying tokens. So, always consider this in the process.
How to Send Funds from Kukai Wallet
There are only two things you need to check before sending funds from your Kukai wallet: the digital asset and the receiver’s public address.
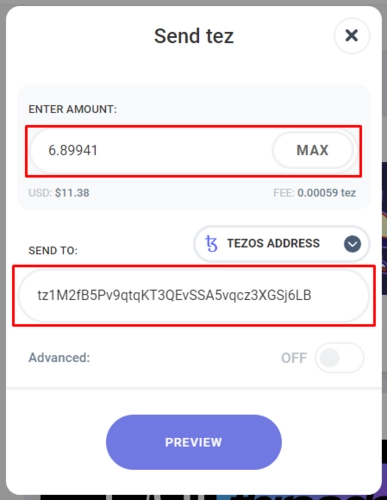
Head to your balances dashboard and click Send tez, represented by an arrow. Input the amount you’ll be transferring to another wallet and the recipient’s address. You can also use their Tezos domains or social media accounts.
How to Connect Kukai to Tezos Dapps
The Kukai wallet enables users to log into any application supported by the Tezos network, ranging from DeFi protocols to NFT platforms. All you need to do is head over to your particular dapp’s webpage and connect your wallet.
You can find either a Connect Wallet button or its equivalent somewhere in the top-right section, or elsewhere. But you’ll definitely find it.
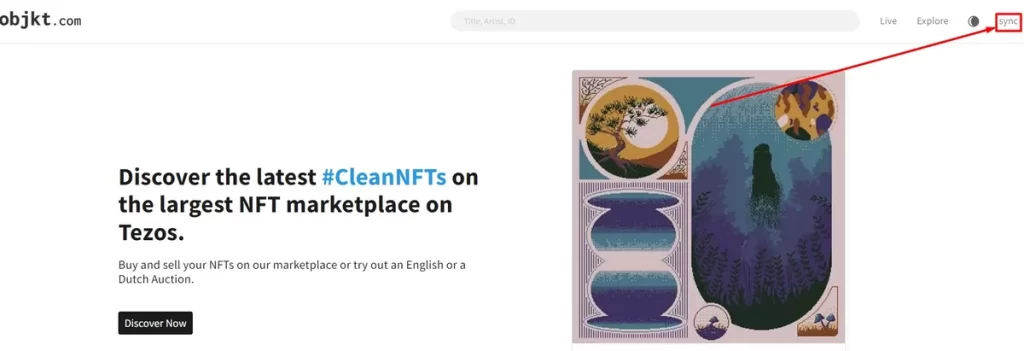
For instance, let’s say we want to connect to the Objkt marketplace so we could buy NFTs. To do that, head over to objkt.com and click on sync, which allows you to choose from your list of available wallets. Pick Kukai.
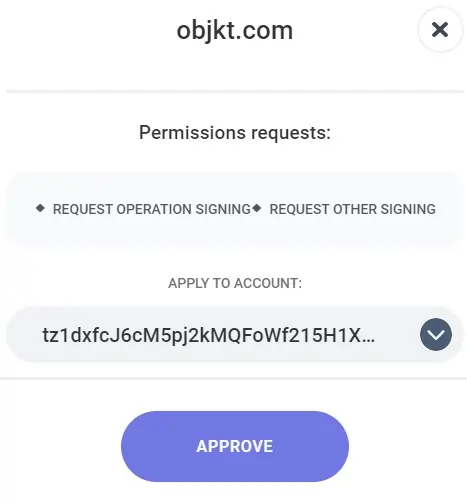
You will then be directed to the Kukai wallet page to confirm the login. Click APPROVE, and then input your password and sign the transaction.
And that’s it! You are now connected Objkt. This applies to all types of dapps on Tezos. Give it a try!
Kukai Supported Assets
Kukai supports the XTZ coin, as well as all tokens built on the FA1.2 and FA2 standards, which are typically tokens that run on the Tezos blockchain.
How to Stake (Bake) XTZ with Kukai Wallet
Baking is the process of confirming transactions and forming new blocks on Tezos. In other blockchains, they usually call this staking. Kukai allows XTZ holders to earn rewards while contributing to the network through baking. And, you can do it directly on your wallet.
In case you don’t have XTZ, see our guide above on how to fund your account.
Once you’re ready to stake, open your Kukai wallet and click Not Staked. It will automatically direct you to the next page, where you can choose a registered baker from the options or search for a specific one.
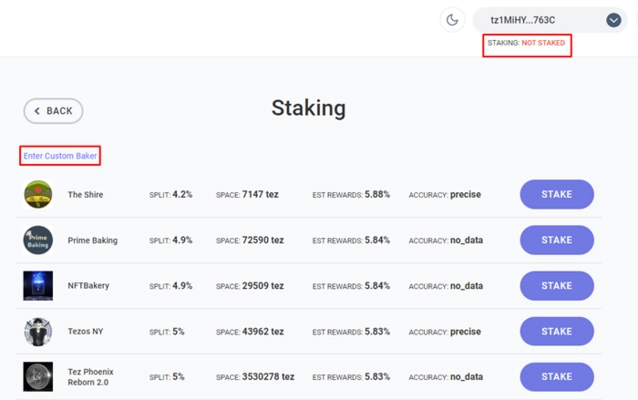
After choosing, hit the Stake button. Next is to input your password and tap Confirm. Note that you won’t receive your rewards immediately as it may take a few days. However, you can still use your tokens anytime as Kukai won’t lock them.
Is Kukai Wallet Safe?
Kukai is one of the safer wallets out there considering it has been independently audited and has over a million monthly users. Notably, its seed phrase is also 24-words, which is more secure than the norm (12-15 words).
However, a blockchain wallet is only as safe as its owner. As long as you keep your wallet secure, especially your private keys and seed phrase, you should be fine. How do you keep it safe?
You need to follow security best practices, such as avoiding clicking on links or attachments sent by people you don’t know, which may come from emails, DMs, etc. But if you’re really serious about keeping your funds safe, you need to get your hands on a hardware wallet and connect it to Kukai.
- See our Best Hardware Wallets article
Kukai supports various Ledger devices, which we shall explore in the next section.
How to Connect Kukai to Ledger
Please see Kukai’s Ledger docs.
How to Recover Kukai Wallet with Seed Phrase
Your Kukai wallet should be a safe home for your digital assets, but there may be unfortunate events that cause you to lose access to it. This can be from damaged devices or forgotten passwords. Don’t worry; you can restore access anytime as long as you have the seed phrase.
First, you need to launch the Kukai application in your browser, but remember to be more cautious this time.
Click Import Wallet and select Seed Phrase.
Input your 24-word mnemonic phrase in order and hit the Import button. We also recommend changing your password and setting up a stronger one this time.
Ta-da! You have successfully recovered your Kukai wallet.
Does Kukai Have a Mobile Wallet?
No, Kukai only has a web app for now.
Join our newsletter as we build a community of AI and web3 pioneers.
The next 3-5 years is when new industry titans will emerge, and we want you to be one of them.
Benefits include:
- Receive updates on the most significant trends
- Receive crucial insights that will help you stay ahead in the tech world
- The chance to be part of our OG community, which will have exclusive membership perks


