One year ago today, Midjourney (MJ) released its groundbreaking AI-powered image generator, which has since revolutionized the field of digital art and design along with similar tools.
Currently, there are five versions of Midjourney: V1, which was released in March 2022, V2 (April 2022), V3 (July 2022), V4 (November 2022), and V5 (March 2023). Each of them offers different aesthetic and features.
There are two ways to switch between Midjourney models: Flexible and permanent.
For the flexible way, simply enter “–version” or “–-v” (that’s two dashes) and the version number of the Midjourney model you want to use at the end of your prompt.

How to Set the ‘Version’ Parameter

For the permanent one, in case you’d like to use the same Midjouney version for your succeeding images and not enter it repeatedly, just type “/settings” on the prompt box and hit Enter.

From there, you could choose from the version you prefer. You can always repeat the process if you want to change your model. Moreover, you must remember the MJ version you’re using at the moment, as specific parameters would not work on other versions.
Apart from the major versions you can test, Midjourney also offers three ‘submodels’ of its V4 model, called 4a, 4b, and 4c. You can access them by adding “–style” and your chosen model at the end part of your V4 prompt.

How to Set the V4 ‘Style’ Parameter

Note: Midjourney’s default model right now is V4 Style 4c, and there’s no need to enter the “–style 4c” prompt when you want to try this sub-model.
Let us now differentiate V4’s mini models from each other.
4a offers visual features that scream ‘AI art,’ with mesmerizing aesthetics but with the typical soft, slightly blurry visuals and fewer details.
4b and 4c add more visual details, and while they may not make an image more realistic, they make it crisper and visually appealing.
These sub-models, while distinct in their offerings, cannot be definitively ranked as ‘better’ or ‘worse’ than one another. Instead, their unique visual outputs are tailored to suit a variety of use cases and platforms.
Some may need digital art that uses fewer details, some want a little bit more, while some necessitate full-blown photorealism on their images. You get the idea. We’ll test each of these submodels individually.
Midjourney V4 vs. V5
Midjourney’s V4 and V5 versions are not meant to compete and outdo each other, as they cater to the artists’ and general users’ different needs. This means that in the grander scheme of things, no one is really better than the other.
But V5 has rolled out key improvements that Midjourney users can add to their arsenal of AI-powered art tools.
These upgrades include higher-resolution images, more realistic output, better coherence, and wider aspect ratios. It has also resurrected its Tile parameter (which creates image patterns) and allows users to apply more styles to their images. And as many users like to point out: A better (but not perfect) portrayal of hands.
Ironically, MJ’s near-perfect and overly detailed output turns off a lot of users. It turns out that many users prefer the surprising experience of repeatedly generating images until they create the one they want.
Oh, brother, the problems that people have today.
Moreover, some even prefer the softer and less detailed AI art of V4. This only proves that V4 and V5 cater to different types of users and are not necessarily in competition with each other.
Midjourney V5: Photorealism at Its Finest
Photorealism is arguably the best feature of Midjourney’s latest model. I also dare say that no other AI art platforms have ever come close to generating such realistic images, though others will surely catch up in a while, but that’s for another article.
To test V5’s god-like photorealism capability, let’s borrow a text prompt to bring out some of the best features of this new model. This prompt comes from Reddit user Archi7 who was able to create stunning, lifelike images out of this one big block of text which others have called ‘word salad.’
Prompt:
_______________________________ Cinematic, Photoshoot, Shot on 25mm lens, Depth of Field, DOF, Tilt Blur, Shutter Speed 1/1000, F/22, White Balance, 32k, Super-Resolution, Megapixel, Pro Photo RGB, VR, Lonely, Good, Massive, Half rear Lighting, Backlight, Dramatic Lighting, Incandescent, Optical Fiber, Moody Lighting, Cinematic Lighting, Studio Lighting, Soft Lighting, Volumetric, Conte-Jour, Beautiful Lighting, Accent Lighting, Global Illumination, Screen Space Global Illumination, Ray Tracing Global Illumination, Optics, Scattering, Glowing, Shadows, Rough, Shimmering, Ray Tracing Reflections, Lumen Reflections, Screen Space Reflections, Diffraction Grading, Chromatic Aberration, GB Displacement, Scan Lines, Ray Traced, ray Tracing Ambient Occlusion, Anti-Aliasing, FKAA, TXAA, RTX, SSAO, Shaders, OpenGL-Shaders, GLSL-Shaders, Post Processing, Post-Production, Cell Shading, Tone Mapping, CGI, VFX, SFX, insanely detailed and intricate, hyper maximalist, elegant, super detailed, dynamic pose, photography, volumetric, ultra-detailed, intricate details, 8K, super detailed, ambient –uplight.
Updated prompt:
_________________________________clear facial features, Cinematic, 35mm lens, f/1.8, accent lighting, global illumination –uplight –v 4.
The blank space in the prompt is where you will insert your subject or your main text prompt, which could also contain a lot of words. The prompt creator was able to reduce the extensive instructions into a single line. But with this shortened command, Archi7 found it hard to replicate the lighting conditions achieved on the first prompt.
So, let’s use the word salad instead; after all, MJ doesn’t charge us for prompt length, right?
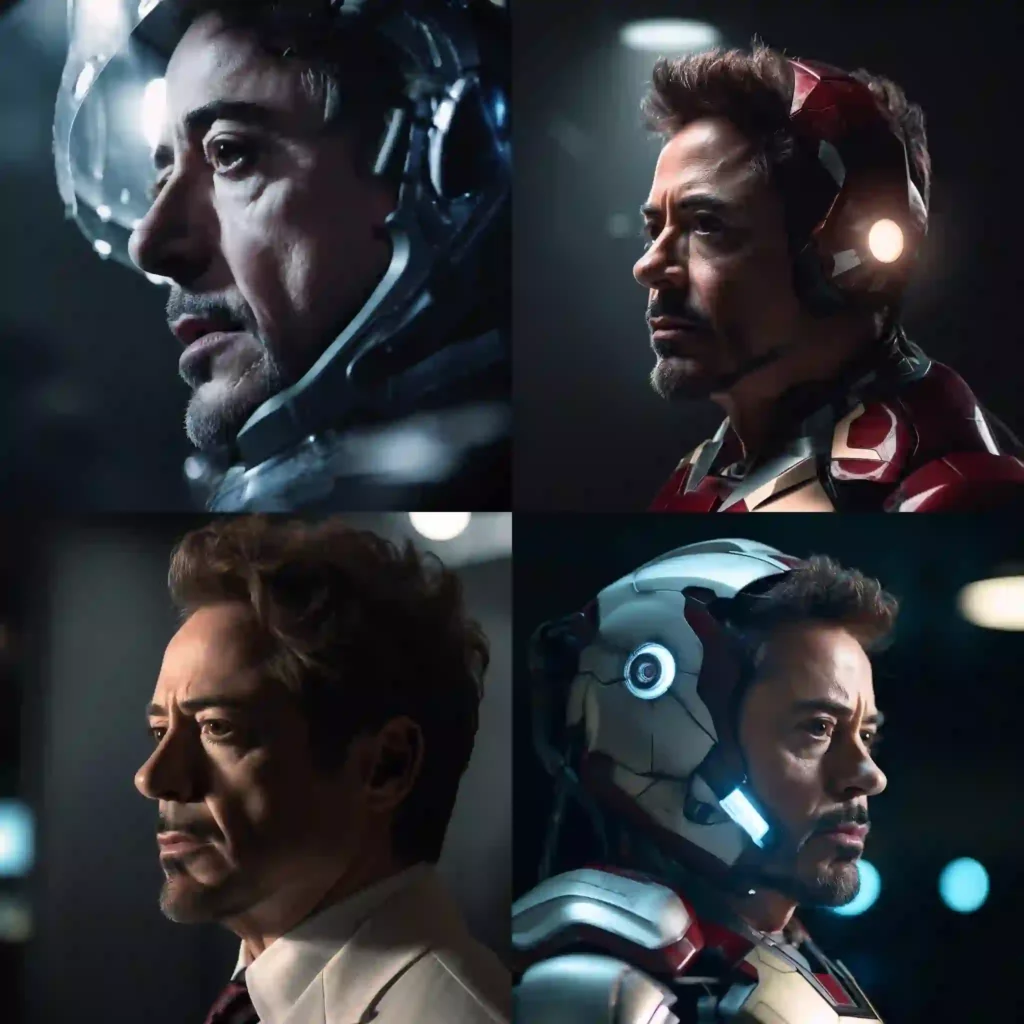
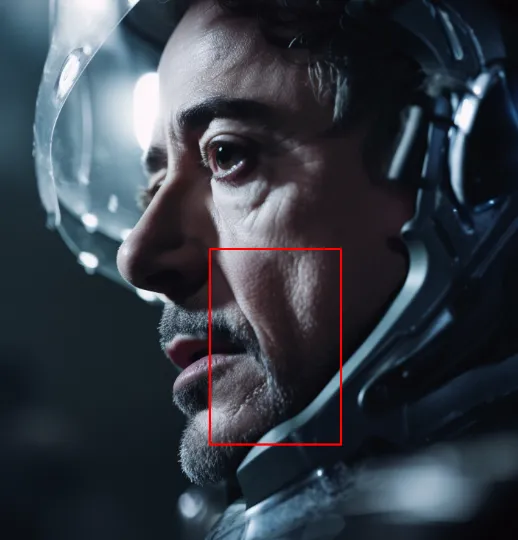
For our quick experiment, let us try the prompt: “Robert Downey Jr. in an Ironman suit, throw in the ultra-long prompt, and let Midjourney do its magic.
You can check out the link below to see the original image from Midjourney and be able to zoom all the images’ unbelievable details.
Robert Downey Jr. in Ironman Suit /Midjourney
Another detail worth noting here is this first image:
Alright, let’s zoom the image on this spot:
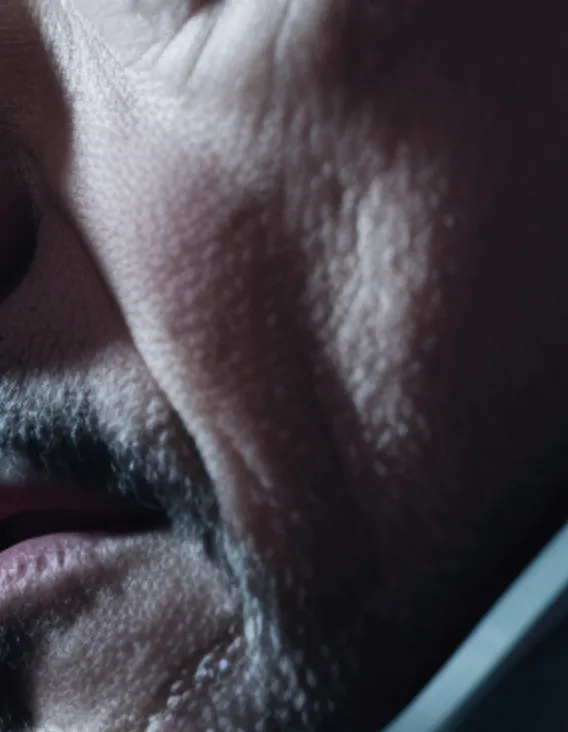
Taking a moment to appreciate MJ’s remarkable advancements, it’s evident that the latest version has made significant strides in rendering lifelike textures and details. The previously ultra-smooth skin, a hallmark of earlier MJ iterations, has been replaced with a more nuanced and realistic representation.
V5’s photorealism can be more appreciated by zooming in on its generated images.
Greater Aspect Ratios Higher Than 2:1 (Experimental)
According to Midjourney’s document, we can finally set our image’s aspect ratio in any measure we want. An aspect ratio is an image’s ‘width-to-height’ ratio.

Tiling
Tiling is the ability to repeat an image to create mesmerizing patterns on your output. This feature is available on Midjourney versions 1, 2, and 3 (removed in V4) and later resurrected in V5. Its return would certainly complement the new model’s photorealistic feature.

How to Set the ‘Tile’ Parameter

Tiling is ideal for creating wallpapers and designing patterns for fabrics, but of course, you could always apply it any-where.
For this quick experiment, I’ll enter a simple prompt:
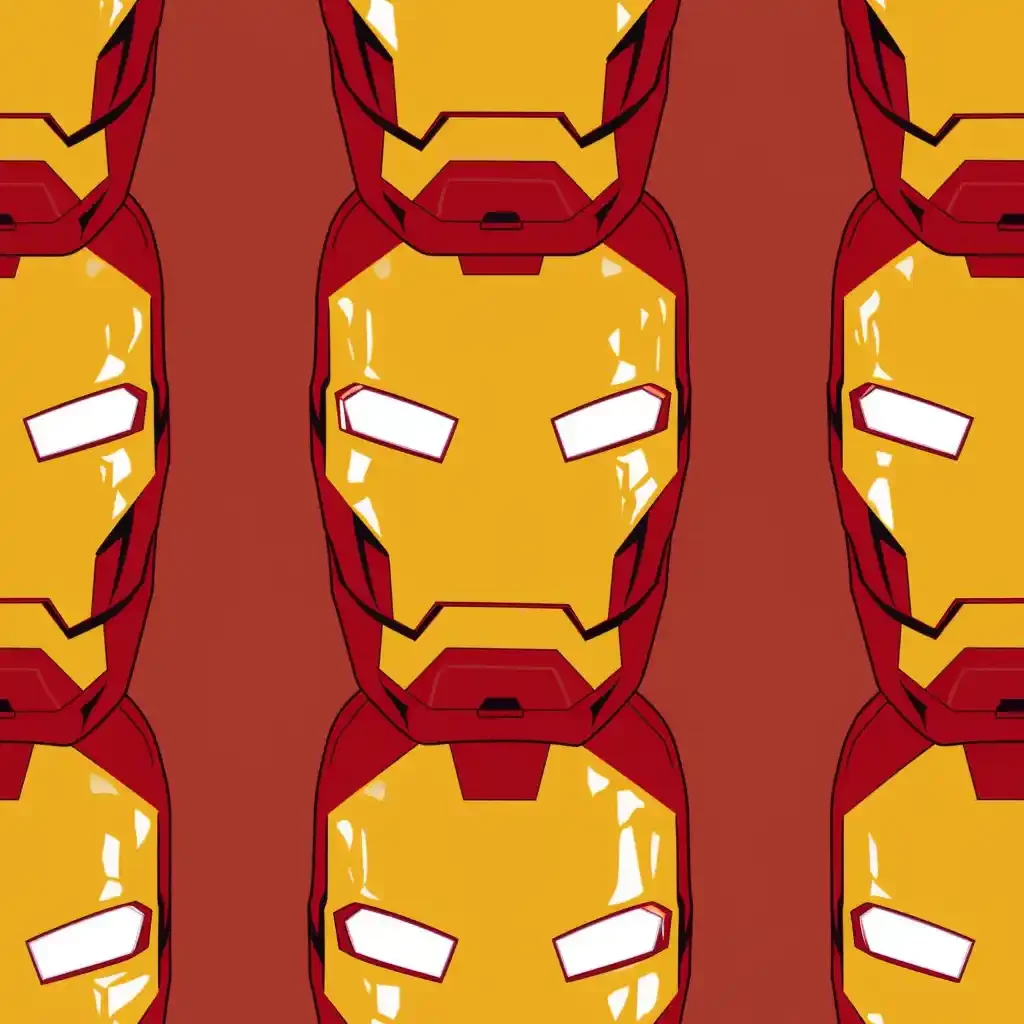
“3 Ironman Mark III masks, cartoon style, –tile –v 5”
And it turns out, V5 can repeat an image in an orderly manner like this ….
Or in a chaotic but still cool-looking pattern like this:
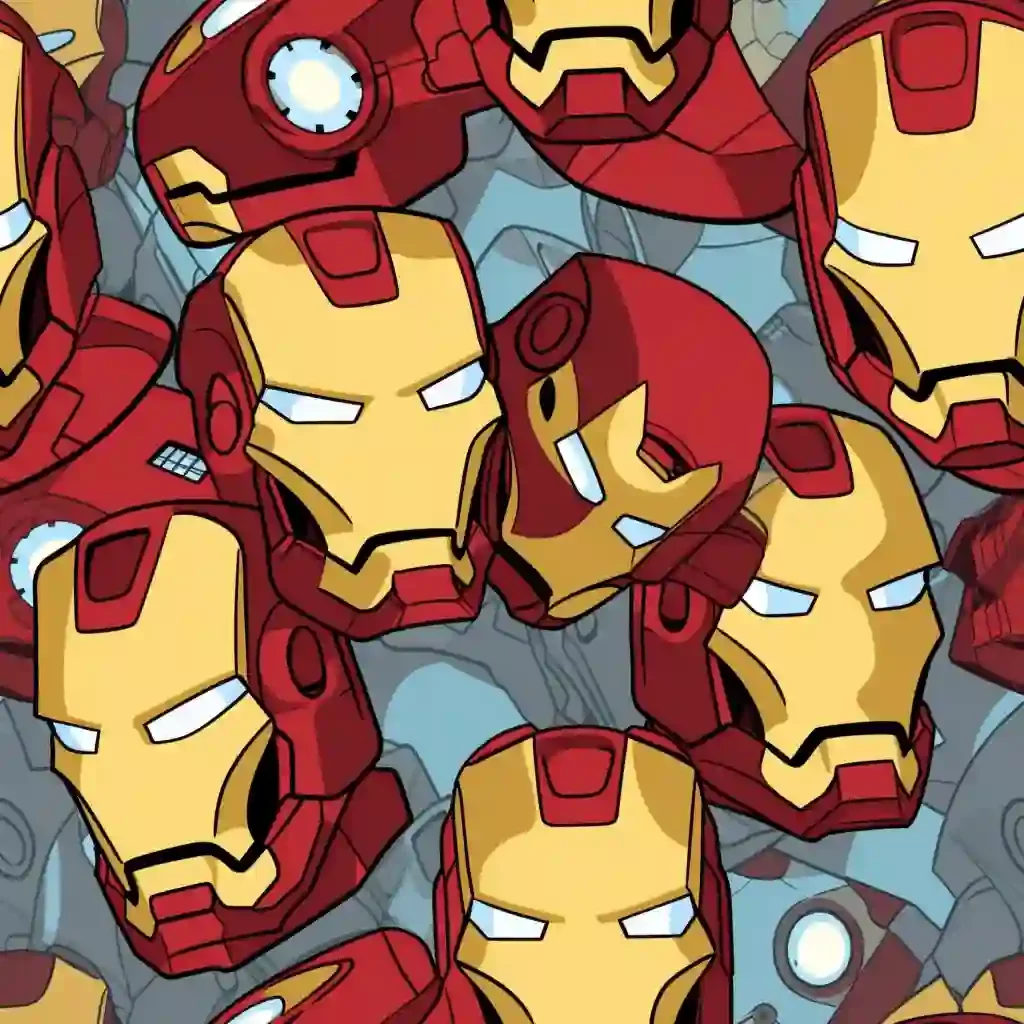
Image Prompting (Also Available in V4)
Image prompting allows you to use an image (URL or device upload) as part of your prompt to influence your generated output.
You may either use an ‘image prompt + text prompt’ or ‘image + image’ to let them influence each other.
For this one, let’s try combining two image prompts (an Ironman helmet + our very own Metaroids mascot). Let’s see how Midjourney fuses these two together.
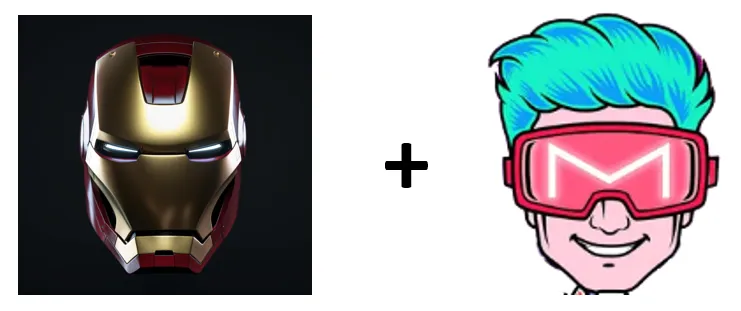
In less than two minutes, MJ produced these cool results!

Founders comment: No!
Look at how MJ combined the elements from the two images with so much ease. The use cases for this feature are almost endless!
Image Weighting
Value: You can set its value from 0.5 to 2. (0.5 is the lowest, while 2 is the highest)

How to Set the ‘Image Weight’ Parameter:

Note: Your entire prompt should be in this order: [image URL] [text prompt] [parameter 1] [parameter 2]
Image weighting or (iw) allows you to adjust the dominance of your given image against your text prompt.
When you insert an image prompt and pair it with a text prompt, which of the two would you like to appear more dominant in V5’s final output?
That’s where you can use an image weight!
When you set your (iw) high, your image prompt will appear more in V5’s final result. And when you set your (iw) low, the image will appear less while your text prompt will be more prominent.
Take a look at this example:
To test the image weight’s capabilities, I entered an Iron Man image URL, paired it with the text prompt ‘polka dots,’ and set my (iw) on varying intensities to test how each image would appear.
Here is the image prompt that I’ve used:
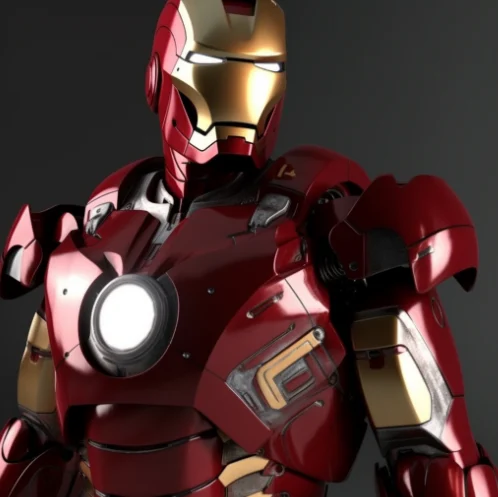
Let’s see how low and how high it would appear in different image weights.
[Ironman Image Prompt], polka dots -iw 0.5
0.5 is the lowest image weight. The (iw) was so low that it completely kicked out Iron Man in the generated image and gave so much power to the ‘polka dot’ text prompt.
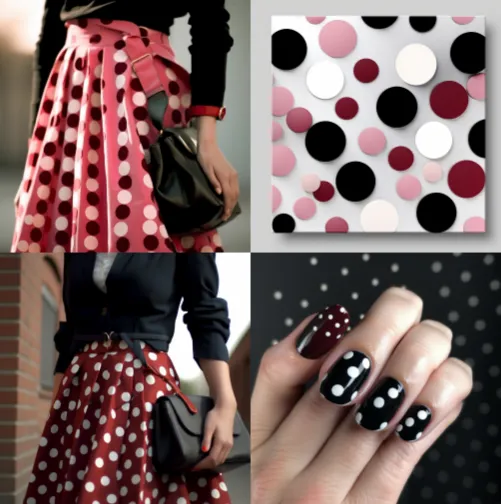
[Ironman Image Prompt], polka dots –iw 1
As we increase the image weight, the image prompt slowly but surely appears in the scene. But since our (iw) isn’t yet too high, the text prompt (polka dots) remains dominant in the results.
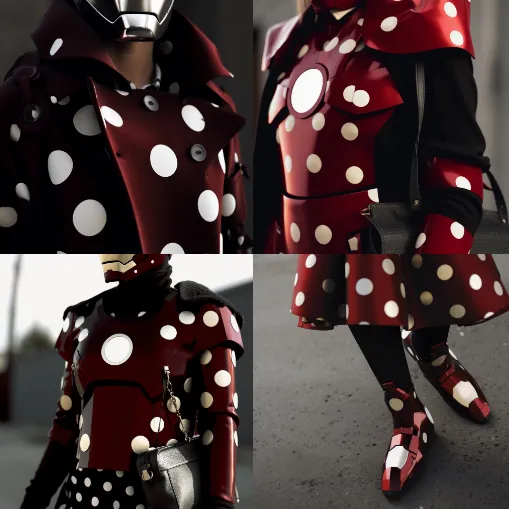
Wait a minute, is that Minnie Mouse in the fourth frame?
[Ironman Image Prompt], polka dots –iw 1.5
At this rate, both the image and text prompts are doing their best to outdo each other and are playing tug-of-war to get the most prominence in the final output.
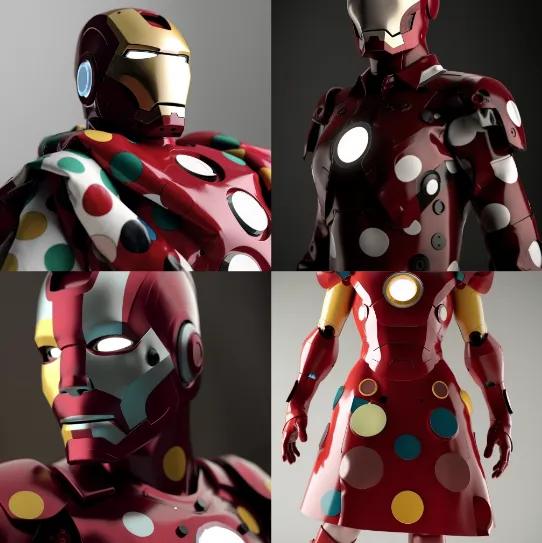
(The fourth image definitely takes the cake here. Don’t blast me off, Mr. Stark)
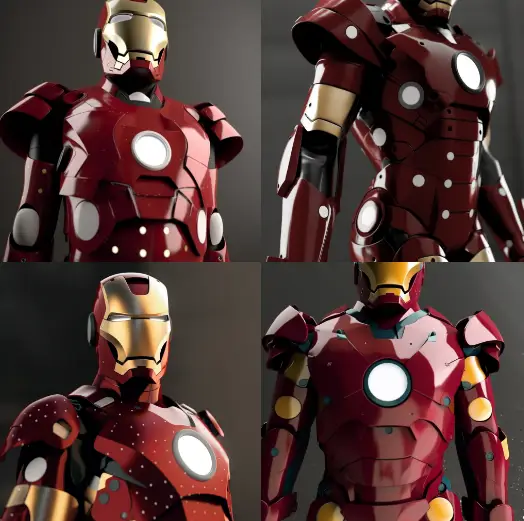
[Ironman Image Prompt], polka dots –iw 2
Now that we’ve set the highest image weight, the image prompt obviously has the most dominant exposure this time, leaving the text prompt with little to no room to shine.
No Default Style (For Now)
Unlike V4, which has its default art style when a user doesn’t include specific descriptions for the text prompt, V5 contains no default style ─ at least for now.
And while this offers creative freedom for MJ fans (hee-hee), the downside is that they need to be more specific with their prompts, as the automated art style is not included in the system.
The choices we have to make. *Bummer*.
Chaos Parameter (Also Available in V4)
Value: You can set its value from 1 to 100.
The ‘chaos parameter’ determines how creative or bold Midjourney would be in reproducing your prompts. The higher the chaos, the more MJ will generate unusual and unexpected results.

How to Set Chaos Parameter:

Let’s now start testing this parameter: Maybe it’s a good idea to start with a modest level. I’ll start with 10.
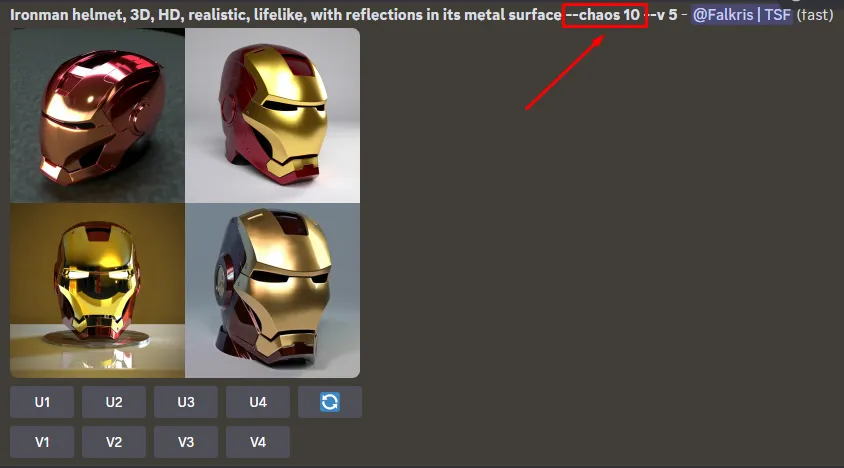
Now, let’s give it a big boost: –chaos 50.
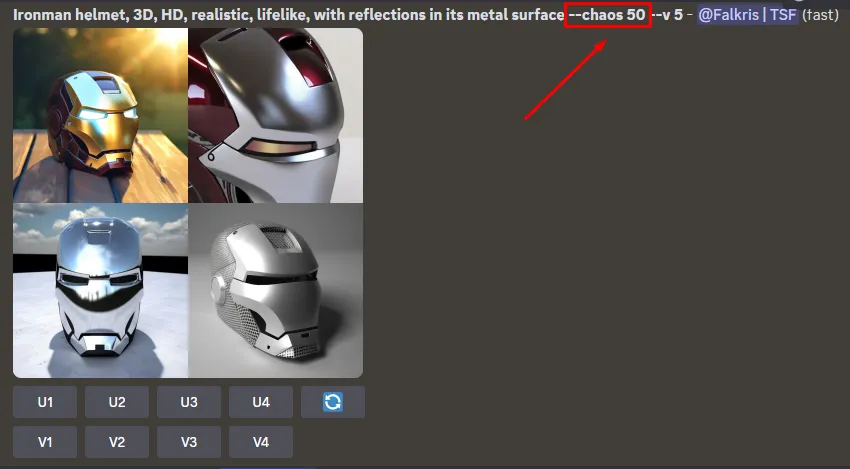
This time, let’s crank the parameter in full swing: – chaos 100
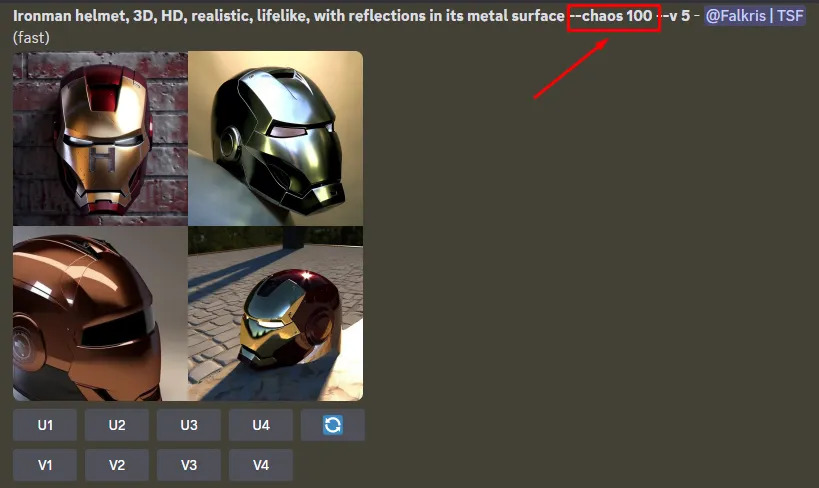
Honest take: I thought the chaos parameter would be as ‘chaotic’ as possible as I increased its intensity. But based on the results, while they are all visually appealing, they are not as bold as expected.
It appears that the chaos parameter is more of a complementary tool for enhancing images and does not have extreme effects on the generated outputs. Our text prompts remain to be our ultimate chaotic tool in improving our images and making them as wild as possible.
Midjourney V4: Leaned on Artistic Outputs
Submodels
In the earlier part of the article, we mentioned the mini-models under Midjourney V4. Now, let’s take a look at how 4a, 4b, and 4c can enhance your images.
Again, to activate these parameters, simply add –-style 4a, –-style 4b, or –style 4c at the end of your prompt.
I intentionally entered a prompt with a single adjective to clearly see how each submodel affects the images and avoid ‘contaminating’ the output too much.
Here’s the prompt I used:
“Lifelike Thor armor”
Now, let’s test how each model would visualize this simple prompt.
Style – 4a
Good enough. But I think I can have better (and fiercer) image outputs with the next submodels.
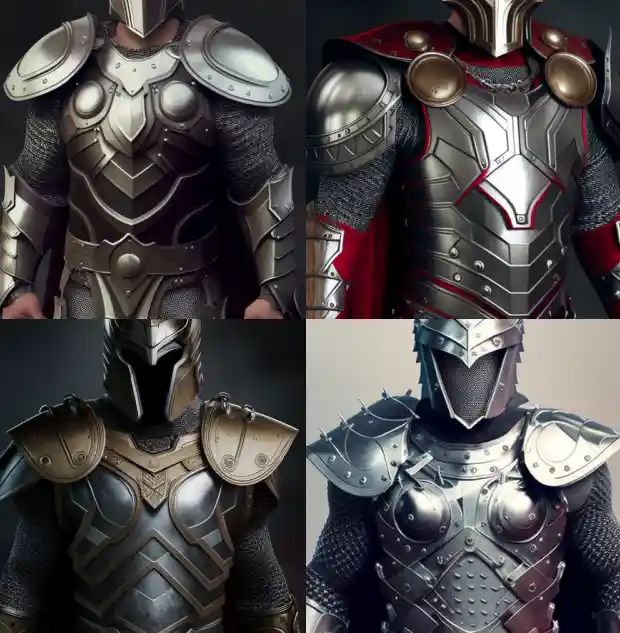
Style – 4b
Without any additional prompts -just a change in the submodel- V4 infused more intricate details in Thor’s four armor variants, making them more visually appealing.

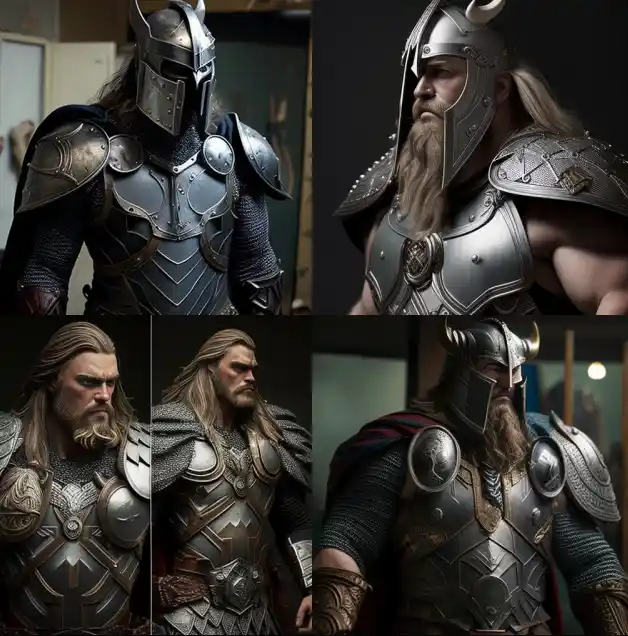
Style – 4c (Default submodel)
A god-like enhancement fit for the god of thunder. 4c added even more details in this one. Moreover, it somehow completely removed Thor’s superhero look in favor of a more warrior/Viking-like aesthetics, which could be MJ’s attempt to lean closer to a Norse mythology character look.
More Realistic Images (Compared to V3)
This feature is arguably the one that got everyone crazy about Midjourney. Since being released last November 2022, V4 users have generated endless streams of images with realistic aesthetics, making MJ one of the most (if not the most) popular AI image generators on the planet.
More Knowledge of Creatures, Places, Etc (Compared to V3)
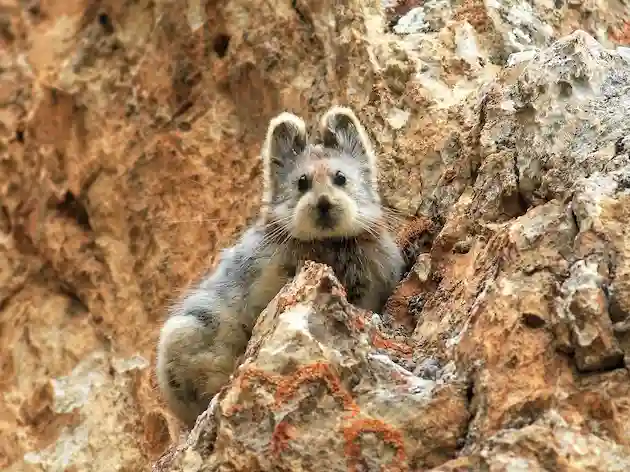
To test V4’s animal know-how, I searched for a rare and nearly extinct creature with no hint of a typical animal name in it.
And I selected this one and even included its scientific name.
Ili Pika (Ochotona iliensis)
And guess what? V4 generated a correct image!
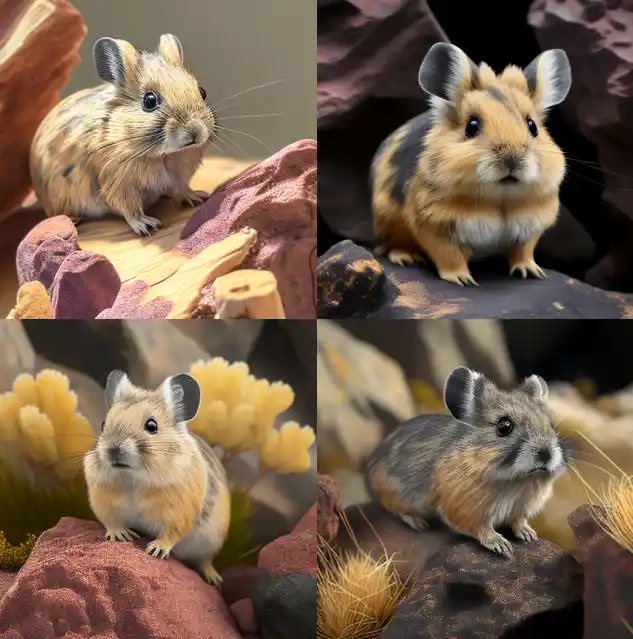
Here’s what it looks like in real life:
Upscaling Images and Customizing Aspect Ratios
The ability to upscale generated images has enabled users to maximize the stunning visuals V4 can provide.
It also gave greater freedom for creativity by allowing them to choose various aspect ratios for their images to cater to their different needs.
While these are considered minor features compared to V4’s other bigger offerings, they undoubtedly gave artists and general users much-needed flexibility in creating AI-generated images.
Logo, Tattoo, and App Icon Designing
Conceptualizing for designs has now been significantly reduced (if not eliminated) with MJ V4’s creativity and fast generation.
It has opened opportunities for a lot of users to be their own visual graphic artists and nail the logo they really want for their business and other ventures.
Moreover, you can generate as many revisions as you want without the high cost and time needed for typical artists to accomplish them. What’s not to love, right?
Of course, there are limitations to V4’s digital designing, which only seasoned graphic artists can accomplish, but the barrier to virtual designing has been significantly lowered because of Midjourney V4.
Midjourney V3: Ideal for Old-School Style AI Art
The First MJ Model to Introduce ‘Stylize’ and ‘Quality’ Parameter
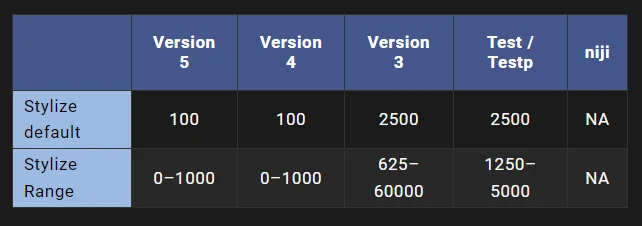
‘Stylize’ parameter allows you to adjust V3’s leanings on specific colors, forms, and composition. As you increase this parameter, you can also generate increasing creativity in your output. The only downside is that, as it goes higher, it ignores the specific instructions in your prompt more and more.

This parameter is also available in v3, v4, and v5 and can be paired with ‘test’ and ‘testp’ models. Take a look at the varying ‘stylize’ intensities each one requires.
How to Set ‘Stylize’ Parameter

‘Quality’ parameter, meanwhile, adjusts the time it takes for MJ to produce an image. The longer the time it generates, the more details it infuses. And the less time it creates an image, the fewer details it includes in the final output.
Here are the values you can use on the “–quality” parameter: “.25”, “.5”, “1”, and “2”. No in-betweens. It can also be paired with the ‘niji’ parameter. Moreover, the value ‘2’, which is the highest, cannot be used on MJ Versions 4, 5, and ‘niji’.

How to Set ‘Quality’ Parameter

Note that adjusting MJ V3’s quality parameter higher does not necessarily increase an image’s resolution, but only its details.
Why Do Users Still Love This Model?
V4 and V5 obviously have the upper hand when it comes to sophisticated image generation compared to V3.
But Midjourney Version 3 has a distinct abstract art style that a lot of artists and users (including me) still love.
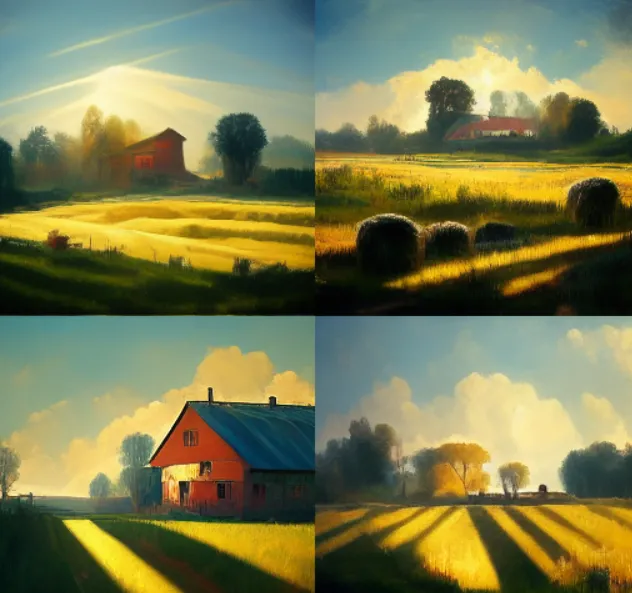
In a time when we are bombarded with endless streams of hyperrealistic images, V3 offers a retina break by providing soft and warm art pieces, which, like real-life abstract paintings, are so relaxing to look at.
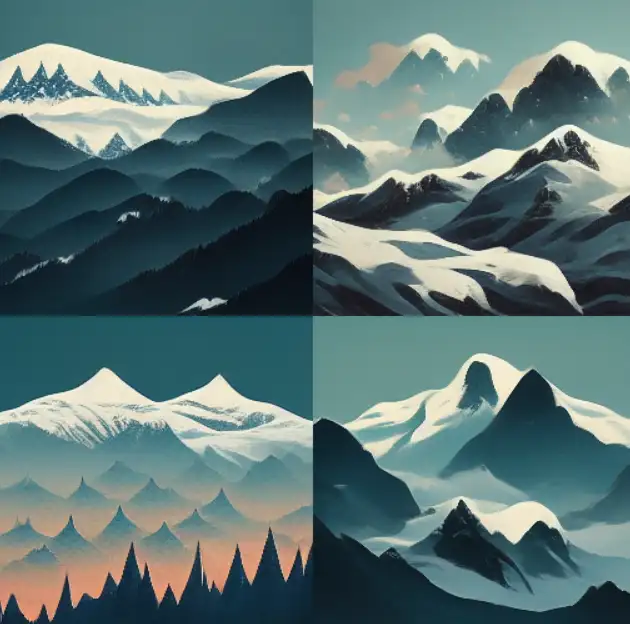
V3’s gentle and warm depiction of users’ prompts enabled it to secure a special place in people’s hearts despite the continuous evolution of Midjourney’s versions.
It retains its capability to create calming artworks, which reminds me of how Bob Ross creates his masterpieces with so much calmness and clarity.
Test and Niji Models
Can’t get enough of V5 and the three submodels of V4? Well, you may finally quench your artistic thirst with three other models called ‘Niji,’ ‘test,’ and ‘testp’.
The Niji model infuses “anime and illustrative styles” into your images and prompts, giving them an ‘anime-fied’ aesthetics. ‘Love this one.

How to Set the ‘Niji’ Parameter:

‘Test’ and ‘testp’ models, meanwhile, are experimental (test) models that MJ may only release temporarily to gather enough feedback.

How to Set ‘Test’ Parameter

‘Test’ is aimed at general-purpose artistic reproductions, while ‘Testp’ or ‘test photo’ creates photorealistic versions of images.
You can activate these test models by entering “–test” or “–testp” + (a value from 1250 – 5000) at the end of your prompt.
You may also want to check out:
- 200 Midjourney Text Prompts to Level Up Your Images
- How to Generate Cool Full-Body Shots in Midjourney
Master AI Art Generation with Midjourney
Midjourney’s trajectory mirrors Apple’s legendary ascent. Mastering how to use it today is crucial to dominating in the future as a creative.
Join the NeoBlush Midjourney newsletter and become an AI juggernaut.

